|
|
○ はじめに
Android アプリケーション(Activity) の UI は、android.view.ViewGroup および android.view.View を使ったツリー構造で定義します。
android.view.View はこれまでにも出てきていますが、画面上のある矩形領域の描画を担当するクラスです。画面の一部であることもあれば、画面全体を表すこともあります。
これに対して android.view.ViewGroup は、他の View や ViewGroup を管理し、画面上にどの様にレイアウトするかを決めるためのクラスです。Android SDK では、この ViewGroup を継承して作られた様々なレイアウト管理用のクラスが用意されています。
今後のサンプルを作成するに際し、レイアウト管理用クラスを使って自作 View や UI 部品を配置したいと思うことがあるだろうということもあり、ここでは ViewGroup を継承しているクラスの中でも、android.widget パッケージ内の XXXXLayout という名前のレイアウト管理用クラスについて紹介したいと思います。
deprecated 指定されているクラスは記載しません。
○ FrameLayout
android.widget.FrameLayout は、最も単純なレイアウトクラスです。子に指定した View は、その左上角が画面の左上角と一致する様に配置されます。位置を指定することはできません。よって、複数の View を子に指定した場合は、後に追加した View が前の View を上書きする形になります。
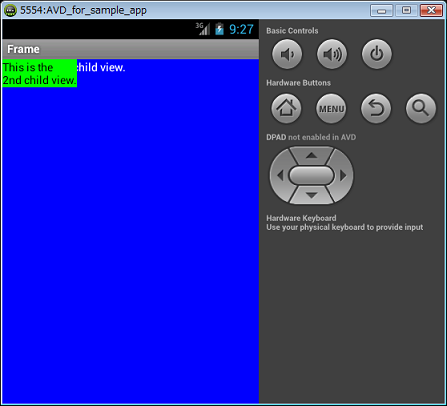
↓がQVGA(320x480:mdpi)エミュレータで実行した FrameLayout の画面サンプルです。緑の矩形に隠れて見えませんが、青い方の矩形には "This is the 1st child view." と書かれています。
↓がレイアウト定義ファイルです。
<?xml version="1.0" encoding="utf-8"?>
<FrameLayout xmlns:android="http://schemas.android.com/apk/res/android"
    android:layout_width="fill_parent"
    android:layout_height="fill_parent">

<TextView
    android:layout_width="fill_parent"
    android:layout_height="fill_parent"
    android:text="This is the 1st child view."
    android:background="#0000ff"
    android:textColor="#ffffff"/>

<TextView
    android:layout_width="wrap_content"
    android:layout_height="wrap_content"
    android:text="This is the\n2nd child view."
    android:background="#00ff00"
    android:textColor="#000000"/>

</FrameLayout>
- FrameLayout
- TextView
- TextView
↑の様な構造です。
FrameLayout は、android:layout_width/layout_height が "fill_parent" のため、親全体に広がります。全ての子要素の左上角が同じ位置になるため、二番目の TextView が一番目の TextView を上書きする様に配置されることが分かると思います。
最初の TextView は、android:background="#0000ff" および android:textColor="#ffffff" により、背景が青で文字が白となります。
次の TextView は、android:layout_width/layout_height が "wrap_content" のため、表示内容である "This is the \n2nd child view." という文字列を囲む大きさとなります。また、android:background="#00ff00" のため背景は緑です(文字は"#000000"で黒)。
○ GridLayout
android.widget.GridLayout は、格子杖に View を配置します。まず、縦横?x?の格子とするかを GridLayout に指定し、配置する子要素に対してどの格子に貼りつけるか行番号と列番号を指定します。例えば3x3の格子の場合、行列番号は下記の様になります。
| (0,0) | (0,1) | (0,2) |
| (1.0) | (1,1) | (1,2) |
| (2,0) | (2,1) | (2,2) |
子要素は、それぞれの格子に貼り付けることも出来れば、行あるいは列方向に複数の格子にまたがって貼り付けることも出来ます。
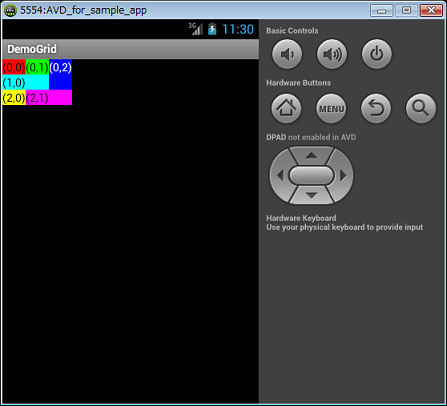
- GridLayout サンプル1(QVGA(320x480:mdpi)エミュレータで実行)
↓がレイアウト定義ファイルです。
<?xml version="1.0" encoding="utf-8"?>
<GridLayout xmlns:android="http://schemas.android.com/apk/res/android"
    android:layout_width="wrap_content"
    android:layout_height="wrap_content"
    android:background="#000000"
    android:columnCount="3"
    android:rowCount="3">

  <TextView
      android:text="(0,0)"
      android:background="#ff0000"
      android:textColor="#000000"
      android:layout_column="0"
      android:layout_row="0"/>

  <TextView
      android:text="(0,1)"
      android:background="#00ff00"
      android:textColor="#000000"
      android:layout_column="1"
      android:layout_row="0"/>

  <TextView
      android:text="(0,2)"
      android:background="#0000ff"
      android:textColor="#ffffff"
      android:layout_column="2"
      android:layout_row="0"
      android:layout_rowSpan="2"
      android:layout_gravity="fill"/>

  <TextView
      android:text="(1,0)"
      android:background="#00ffff"
      android:textColor="#000000"
      android:layout_column="0"
      android:layout_columnSpan="2"
      android:layout_row="1"
      android:layout_gravity="fill"/>

  <TextView
      android:text="(2,0)"
      android:background="#ffff00"
      android:textColor="#000000"
      android:layout_column="0"
      android:layout_row="2"/>

  <TextView
      android:text="(2,1)"
      android:background="#ff00ff"
      android:textColor="#000000"
      android:layout_column="1"
      android:layout_columnSpan="2"
      android:layout_row="2"
      android:layout_gravity="fill"/>

</GridLayout>
GridLayout の android:columnCount および android:rowCount で、?x? の格子にするか設定します。ここでは 3x3 としました。子要素の TextView には、android:layout_column および android:layout_row によりどの列、どの行に配置するかを設定します(0から)。
(0,2) の TextView は行方向に 2 格子にまたがらせるために android:layout_rowSpan を 2 に設定しています。(1,0)、(2,1) の TextView は列方向に 2 格子にまたがらせるために、android:layout_columnSpan を 2 に設定しています。これらの TextView は android:layout_gravity を "fill" としています。これが無いと、配置は 2 格子にまたがっているのに 1 格子分しか塗りつぶされなかったためです。
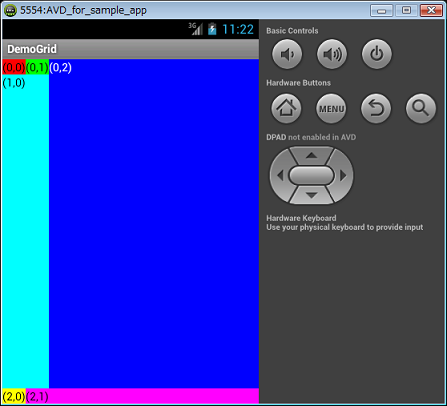
- GridLayout サンプル2(QVGA(320x480:mdpi)エミュレータで実行)
↓がレイアウト定義ファイルです。
<?xml version="1.0" encoding="utf-8"?>
<GridLayout xmlns:android="http://schemas.android.com/apk/res/android"
    android:layout_width="fill_parent"
    android:layout_height="fill_parent"
    android:background="#000000"
    android:columnCount="3"
    android:rowCount="3">

  <TextView
      android:text="(0,0)"
      android:background="#ff0000"
      android:textColor="#000000"
      android:layout_column="0"
      android:layout_row="0"/>

  <TextView
      android:text="(0,1)"
      android:background="#00ff00"
      android:textColor="#000000"
      android:layout_column="1"
      android:layout_row="0"/>

  <TextView
      android:text="(0,2)"
      android:background="#0000ff"
      android:textColor="#ffffff"
      android:layout_column="2"
      android:layout_row="0"
      android:layout_rowSpan="2"
      android:layout_gravity="fill"/>

  <TextView
      android:text="(1,0)"
      android:background="#00ffff"
      android:textColor="#000000"
      android:layout_column="0"
      android:layout_columnSpan="2"
      android:layout_row="1"
      android:layout_gravity="fill"/>

  <TextView
      android:text="(2,0)"
      android:background="#ffff00"
      android:textColor="#000000"
      android:layout_column="0"
      android:layout_row="2"/>

  <TextView
      android:text="(2,1)"
      android:background="#ff00ff"
      android:textColor="#000000"
      android:layout_column="1"
      android:layout_columnSpan="2"
      android:layout_row="2"
      android:layout_gravity="fill"/>

</GridLayout>
先程の例から、GridLayout の android:layout_width および android:layout_height を "wrap_content" から "fill_parent" に変えただけです。(0,2)と(2,1) の格子が画面を塗りつぶすまで延ばされているのが分かります。
○ LinearLayout
android.widget.LinearLayout は、水平あるいは垂直方向に View を配置します。
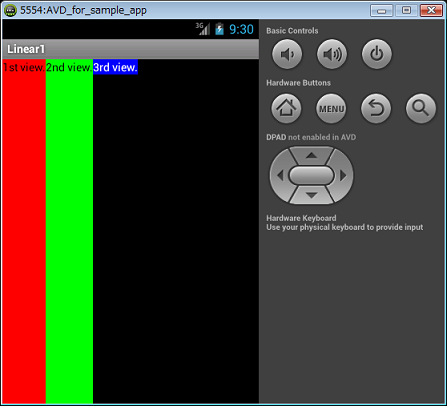
- LinearLayout 水平方向サンプル1(QVGA(320x480:mdpi)エミュレータで実行)
<?xml version="1.0" encoding="utf-8"?>
<LinearLayout xmlns:android="http://schemas.android.com/apk/res/android"
    android:layout_width="fill_parent"
    android:layout_height="fill_parent"
    android:orientation="horizontal"
    android:background="#000000">

<TextView
    android:layout_width="wrap_content"
    android:layout_height="fill_parent"
    android:text="1st view."
    android:background="#ff0000"
    android:textColor="#000000"/>

<TextView
    android:layout_width="wrap_content"
    android:layout_height="fill_parent"
    android:text="2nd view."
    android:background="#00ff00"
    android:textColor="#000000"/>

<TextView
    android:layout_width="wrap_content"
    android:layout_height="wrap_content"
    android:text="3rd view."
    android:background="#0000ff"
    android:textColor="#ffffff"/>

</LinearLayout>
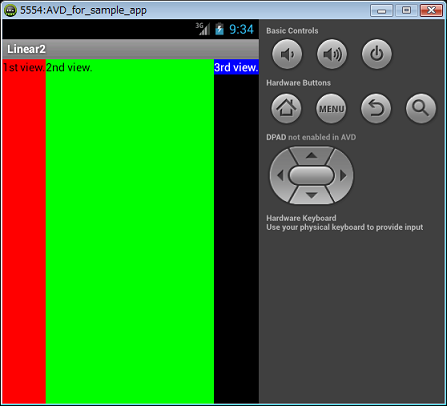
LinearLayout の android:orientation を "horizontal" にすることで、水平方向に View を配置します。TextView の android:layout_width は全て "wrap_content" のため、文字列の幅と同じ幅となっています。また、android:layout_height は最後の TextView のみ "wrap_content" のため、文字列の高さと同じ高さとなっています。
- LinearLayout 水平方向サンプル2(QVGA(320x480:mdpi)エミュレータで実行)
<?xml version="1.0" encoding="utf-8"?>
<LinearLayout xmlns:android="http://schemas.android.com/apk/res/android"
    android:layout_width="fill_parent"
    android:layout_height="fill_parent"
    android:orientation="horizontal"
    android:background="#000000">

<TextView
    android:layout_width="wrap_content"
    android:layout_height="fill_parent"
    android:text="1st view."
    android:background="#ff0000"
    android:textColor="#000000"/>

<TextView
    android:layout_width="wrap_content"
    android:layout_height="fill_parent"
    android:layout_weight="1"
    android:text="2nd view."
    android:background="#00ff00"
    android:textColor="#000000"/>

<TextView
    android:layout_width="wrap_content"
    android:layout_height="wrap_content"
    android:text="3rd view."
    android:background="#0000ff"
    android:textColor="#ffffff"/>

</LinearLayout>
水平方向サンプル1 と違うのは、二番目の TextView に android:layout_weight="1" と指定している点です。weight を "1" とすることで、画面に余白がある場合はそれを埋める様に配置されます。二番目の TextView(緑色)が水平方向サンプル1 よりも伸びていることが分かると思います。
- LinearLayout 垂直方向サンプル1(QVGA(320x480:mdpi)エミュレータで実行)
<?xml version="1.0" encoding="utf-8"?>
<LinearLayout xmlns:android="http://schemas.android.com/apk/res/android"
    android:layout_width="fill_parent"
    android:layout_height="fill_parent"
    android:orientation="vertical"
    android:background="#000000">

<TextView
    android:layout_width="fill_parent"
    android:layout_height="wrap_content"
    android:text="This is the 1st child view."
    android:background="#ff0000"
    android:textColor="#000000"/>

<TextView
    android:layout_width="fill_parent"
    android:layout_height="wrap_content"
    android:text="This is the\n2nd child view."
    android:background="#00ff00"
    android:textColor="#000000"/>

<TextView
    android:layout_width="wrap_content"
    android:layout_height="wrap_content"
    android:text="This is the 3rd child view."
    android:background="#0000ff"
    android:textColor="#ffffff"/>

</LinearLayout>
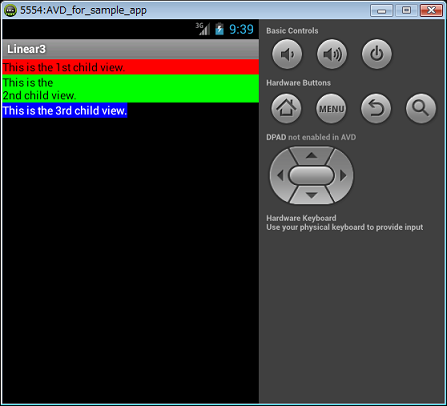
LinearLayout の android:orientation を "vertical" にすることで、垂直方向に View を配置します。方向が違う点以外は、水平方向サンプル1 と同じ様な配置となります。
- LinearLayout 垂直方向サンプル2(QVGA(320x480:mdpi)エミュレータで実行)
<?xml version="1.0" encoding="utf-8"?>
<LinearLayout xmlns:android="http://schemas.android.com/apk/res/android"
    android:layout_width="fill_parent"
    android:layout_height="fill_parent"
    android:orientation="vertical"
    android:background="#000000">

<TextView
    android:layout_width="fill_parent"
    android:layout_height="wrap_content"
    android:text="This is the 1st child view."
    android:background="#ff0000"
    android:textColor="#000000"/>

<TextView
    android:layout_width="fill_parent"
    android:layout_height="wrap_content"
    android:layout_weight="1"
    android:text="This is the\n2nd child view."
    android:background="#00ff00"
    android:textColor="#000000"/>

<TextView
    android:layout_width="wrap_content"
    android:layout_height="wrap_content"
    android:text="This is the 3rd child view."
    android:background="#0000ff"
    android:textColor="#ffffff"/>

</LinearLayout>
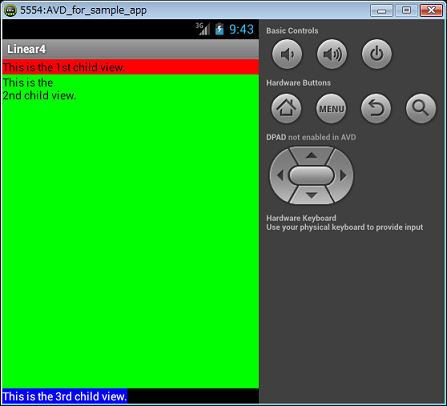
二番目の TextView に android:layout_weight="1" と指定している以外は、垂直方向サンプル1 と同じです。二番目の TextView(緑色)が垂直サンプル1 よりも伸びていることが分かると思います。
○ RelativeLayout
RelativeLayout は、ある View の配置を指定する際に、他の View に対する相対指定によって配置を指定することができます。互いに参照するため、各 View に id を付ける必要があります。
↓QVGA(320x480:mdpi)エミュレータで実行
<?xml version="1.0" encoding="utf-8"?>
<RelativeLayout xmlns:android="http://schemas.android.com/apk/res/android"
    android:layout_width="fill_parent"
    android:layout_height="fill_parent"
    android:background="#000000">

<TextView android:id="@+id/view1"
    android:layout_width="fill_parent"
    android:layout_height="wrap_content"
    android:layout_marginTop="30px"
    android:layout_marginBottom="10px"
    android:text="This is the 1st view."
    android:background="#ff0000"
    android:textColor="#000000"/>

<TextView android:id="@+id/view2"
    android:layout_width="wrap_content"
    android:layout_height="wrap_content"
    android:layout_below="@id/view1"
    android:layout_alignParentRight="true"
    android:layout_marginLeft="10px"
    android:text="This is the 2nd view."
    android:background="#00ff00"
    android:textColor="#000000"/>

<TextView android:id="@+id/view3"
    android:layout_width="wrap_content"
    android:layout_height="wrap_content"
    android:layout_below="@id/view1"
    android:layout_toLeftOf="@id/view2"
    android:text="3rd view."
    android:background="#0000ff"
    android:textColor="#ffffff"/>

<TextView android:id="@+id/view4"
    android:layout_width="wrap_content"
    android:layout_height="wrap_content"
    android:layout_below="@id/view2"
    android:layout_centerHorizontal="true"
    android:layout_marginTop="10px"
    android:text="This is the 4th view."
    android:background="#00ffff"
    android:textColor="#000000"/>

</RelativeLayout>
全ての TextView に id を付けることで、id による参照を可能としています。
"view1" は普通に画面上部に配置します。layout_height="wrap_content" により、文字列と同じの高さを占めます。android:layout_marginTop/layout_marginBottom により、上下に 10px ずつのマージンを設定しています。
"view2" は、android:layout_below="@id/view1" により view1 の下に配置します。かつ、android:layout_alignParentRight="true" により親(RelativeLayout) の右端に揃う様に配置されます。
"view3" は、android:layout_below="@id/view1" および android:layout_toLeftOf="@id/view2" により、view1 の下でかつ view2 の左に配置されます。
"view4" は、android:layout_below="@id/view2" により、view2 の下に配置されます。また、android:layout_centerHorizontal="true" により、水平方向の真ん中に配置されます。
他にも使える配置指定がありますので、APIドキュメントを確認してみて下さい。
○ TableLayout
TableLayout は、View をテーブル状に配置します。
- TableLayout サンプル1(QVGA(320x480:mdpi)エミュレータで実行)
<?xml version="1.0" encoding="utf-8"?>
<TableLayout xmlns:android="http://schemas.android.com/apk/res/android"
    android:layout_width="fill_parent"
    android:layout_height="fill_parent"
    android:background="#000000">

    <TableRow>
        <TextView
            android:text="This is the (1,1) view."
            android:background="#ff0000"
            android:padding="5px"
	    android:textColor="#000000"/>
        <TextView
            android:text="This is the (1,2) view."
            android:background="#00ff00"
            android:padding="5px"
	    android:textColor="#000000"/>
    </TableRow>

    <TableRow>
        <TextView
            android:text="This is the (2,1) view."
            android:background="#0000ff"
            android:textColor="#ffffff"
            android:padding="5px"/>
        <TextView
            android:text="This is the (2,2) view."
            android:background="#00ffff"
            android:padding="5px"
	    android:textColor="#000000"/>
    </TableRow>

    <TableRow>
        <TextView
            android:text="This is the (3,1) view."
            android:background="#ffff00"
            android:padding="5px"
	    android:textColor="#000000"/>
        <TextView
            android:text="This is the (3,2) view."
            android:background="#ff00ff"
            android:padding="5px"
	    android:textColor="#000000"/>
    </TableRow>

</TableLayout>
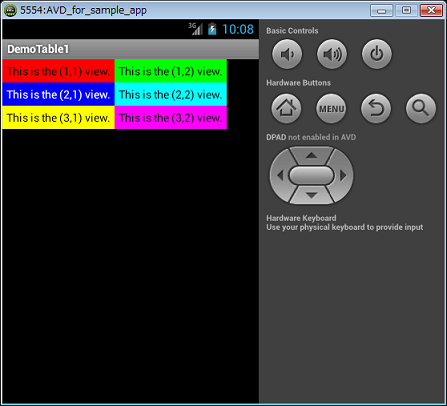
一行を表す <TableRow></TableRow> の間に、その行に並べる TextView を記述します。各 TextView に android:padding="5px" を指定していますが、これが無い場合は各 TextView の文字周りの余白が無くなります。水平方向に広がりきらずに配置されているのが分かると思いますが、これはサンプル2 で解決しています。
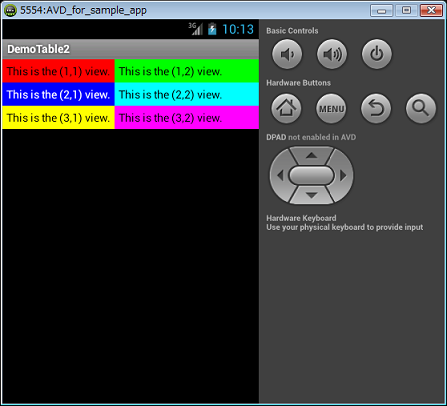
- TableLayout サンプル2(QVGA(320x480:mdpi)エミュレータで実行)
<?xml version="1.0" encoding="utf-8"?>
<TableLayout xmlns:android="http://schemas.android.com/apk/res/android"
    android:layout_width="fill_parent"
    android:layout_height="fill_parent"
    android:stretchColumns="1"
    android:background="#000000">

    <TableRow>
        <TextView
            android:text="This is the (1,1) view."
            android:background="#ff0000"
            android:padding="5px"
	    android:textColor="#000000"/>
        <TextView
            android:text="This is the (1,2) view."
            android:background="#00ff00"
            android:padding="5px"
	    android:textColor="#000000"/>
    </TableRow>

    <TableRow>
        <TextView
            android:text="This is the (2,1) view."
            android:background="#0000ff"
            android:textColor="#ffffff"
            android:padding="5px"/>
        <TextView
            android:text="This is the (2,2) view."
            android:background="#00ffff"
            android:padding="5px"
	    android:textColor="#000000"/>
    </TableRow>

    <TableRow>
        <TextView
            android:text="This is the (3,1) view."
            android:background="#ffff00"
            android:padding="5px"
	    android:textColor="#000000"/>
        <TextView
            android:text="This is the (3,2) view."
            android:background="#ff00ff"
            android:padding="5px"
	    android:textColor="#000000"/>
    </TableRow>

</TableLayout>
サンプル1 と違って、水平方向に広がりきって配置されていることが分かると思います。TableLayout に android:stretchColumns="1" を指定することで、画面の余白が無い様に各列が配置されます。